Getting Started with Lens Studio - Segmentation Template
This walkthrough is part of the Getting Started with Lens Studio series.
In this post, we’re going to look at the Segmentation template in Lens Studio. This is a really great effect which will help you to get started on your journey into AR.
To download the files from this tutorial, please grab them from here.
The video version of the tutorial is above, or you can follow along step by step below!
• The first thing we’re going to do is open Lens Studio and open the Segmentation Template from the start menu
• Within this template, in the Objects panel, you’ll find the Segmentation Controller. This is where we’ll be doing most of our work in this tutorial.
• If we expand all of the drop down elements in the Objects panel to see what we have in this template, at the top you’ll see the Orthographic Camera Masked. This is where we will find the objects that the Segmentation Controller is masking. Why not hit the checkbox to turn off and on the effects so you can see what we will be working with?
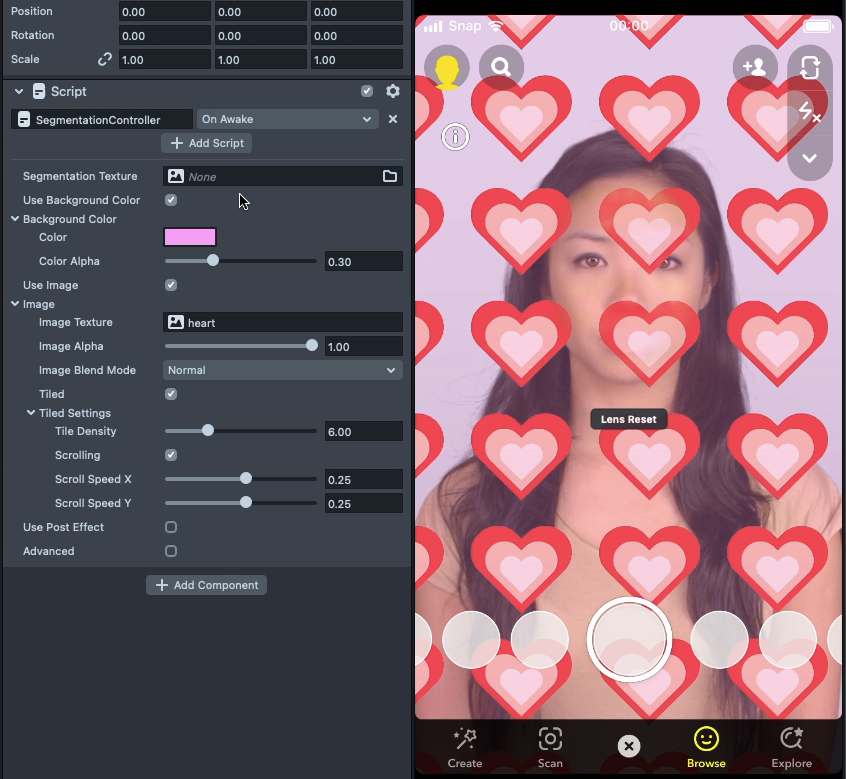
• Ok so let’s take a look at the Segmentation Controller, select it in the Objects panel and then move over to the Inspector panel. Here you’ll see all of the options that the Segmentation Controller surfaces. First let’s untick the Use Background Color option to see what that does.
• Let’s turn that back on and click on the Color option in the drop down menu. Choose a color you’d like here.
• Next, let’s adjust the Color Alpha slider in the drop down. This adjusts the alpha value of the Color and makes it more or less transparent. Have a play around with it to understand it’s effect.
• Ok, next let’s untick the Use Image option. This hides the tiled heart image that has been moving over our background.
• We can also adjust the Image Alpha in a similar way to the Color Alpha, allowing us to make it more or less transparent.
• The Image option also has a few choices under Image Blend Mode, this will Multiply the Image on top of the colour, Screen it over the colour which will lighten it but we’ll stick with Normal for now.
• Below this, we have a checkbox for Tiling the image, if we untick this, it just becomes a regular image which sits behind the user. This is useful if you need a standard, non-patterned background.
• With Tiled enabled again, we can play around with the Tile Density setting, this will make the Tiled Image smaller or larger depending on the value.
• Next let’s look at the Scrolling option. This is what is causing the background image to move. So try enabling and disabling this option. Below this are the speed controllers. If you want to change the direction of the movement try changing the values here.
• Ok next we’re going to import our own background image so in the Resources panel, hit the + button and select import file. Navigate to the background image file I’ve supplied in the download and import it.
• Now we’ve imported it, select it and drag and drop into the Image Texture box in the Segmentation Controller, you should see the background image change immediately. We can also disable the background color option here as we won’t need it.
• Let’s play with the Tile Density with this image to see how it can look like a cool wallpaper background or large to look like you’re in an illustrated jungle.
• Let’s leave it nice and large for now, so that will be less dense in your simulator.
• Next we’re going to look at how the Segmentation Controller masks our image. So in the Segmentation Texture box, right-click and select Clear.
• You’ll see that the background is no longer the background and now sits in front of the user.
• The Resources Panel is where we can find more Segmentation Textures, so hit the + button and navigate down to Segmentation Texture. In the menu, let’s select the Portrait Hair option. Although after the Tutorial is finished please feel free to import a few of these Segmentation Textures and experiment with them to see what they do.
• Ok, now drag the Portrait Hair Segmentation Texture from the Resources panel over into the Segmentation Texture box in the Segmentation Controller.
• As you can see, our background images have now been Segmented into the User’s Hair. A segmentation texture is essentially a mask that blocks out specific parts of an image or video, so in this case, it’s masking out everything but the User’s hair to confine our image pattern to just this part of the screen. Why not have a play around with a few more Segmentation Textures to see what they do?
Anyway, if you’ve made it this far thanks for sticking with it and hope this was helpful for you!
✌🏼Liam


